

Thursday, 8 April 2010
Screen
I am going to use a perfectly sized high quality print of a windows screen saver, which will fit behind a clear piece of 0.5mm acrylic plastic. This will create the effect of having a working screen. I will be using an original windows start up screen with bright colours to add to the effect of a working screen.


Keyboard, base and screen

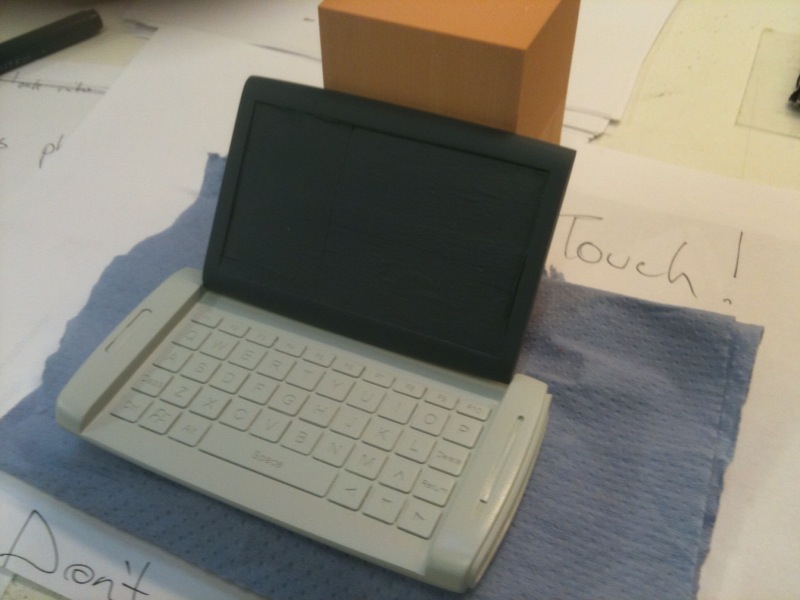

I now have the keyboard and screen sections painted and ready for detail, such as painting the two side rings black, painting in the black acrylic paint detail into the lettering and symbols on the keyboard, I have decided not to use Plastisol as it would take far too long to dry and fitting the high quality printed screen behind a 0.5mm acrylic screen.
I will then need to fit the screen section onto the keyboard section at a good radius for viewing.
I will also produce a simple yet attractive baseboard for the model to sit on.
Keyboard

I have now applied my laser cut keyboard base to the model. Due to slight changes to size when laser cut, I decided to add 0.2mm larger offset so that I could just sand the acrylic slightly till it fits, which worked very well. I will now work out how to produce the keys and lettering marks.
Update!!>>
I have been looking at the best way to produce the keys for the keyboard and how the letters will be done. I looked into rub-on decals, such as http://www.decal-paper.com/rubon.html but as my model may be picked up and played with by prospective clients I have decided to get each key laser engraved and cut. Then once they have been stuck in and painted, I will be able to paint into the engraved letters using a watered down solution of black acrylic paint. Or use Plastisol (ink used for screen printing) ink to rub over the engraved parts.
Update!>>

Here is a photo of my Adobe illustrator file used on the laser cutter. I had to experiment with the engrave power to produce an engrave deep enough to apply the black acrylic paint for the lettering and symbols.
Update!>>>

With the keyboard finally cut with a high power of 80, I applied it to the base of my model. A dab of superglue per key was perfect for keeping the buttons in place. I used fine polyfiller to seal the gaps between the base and acrylic keyboard area and sanded down. With some final fine sanding i applied two fine layers of white primer and proceeded with one final fine sand. I then applied my final 2 coats of my chosen colour. Due to not having any colour swatches given by the designer I had to make the colour as close as possible from images I have. I think I was quite successful, but I may add a fine gloss coat to add the aesthetics.
Wednesday, 3 March 2010
Screen

I had a chat with my tutor today about certain aspects of my model. The screen being the most important. I have now decided to mark off a 44mm by 77mm screen which matches my drawings. I will mill 0.5mm into the chemiwood so that a 0.5mm piece of acrylic will be able to fit into it. I will use a high quality print of a simple but eye catching windows screen saver behind the 0.5 acrylic to give the affect of a working screen.
Update!!>>


Filler!


I have now stuck the mouth and ear piece onto the base of the model. I have used body filler to seal small gaps, being very sparing so not to over fill thus more time spent sanding.
As you can see I have also milled in to the keyboard area of the keyboard section. I will now be able to draw out the keyboard with letters on rhino and transfer to illustrator ready for lasercutting.
Tuesday, 2 March 2010
Materials!
I chose to use Chemiwood for this model as it has similar characteristics as wood but I dont have to sand seal the model, which will save me a fair amount of sealing and sanding. I also used it due to the fact that I can Mill the material and fill and sand without any issues.
I will be using 1mm and 0.5mm laser cut acrylic for the keyboard and detail on the top and bottom of the mobile phone.
I am still waiting for information on what materials the actual mobile phone uses. After I have heard back from my designer, I will be able to sort out what paint will be used.
One problem that I have not yet solved is how to do the screen. I will be having a talk with my tutors soon and will work out what I will have to do to produce a screen that looks as high standards as possible.
Correct Size!


Size issues have now been corrected and the model now looks alot smaller and more like a mobile phone. At the moment my time planning has been very poor due to complications at home and complication with my designer. I have been putting in more and more hours everyday to get this model finished to a high standard. I am pleased with my progress this week and have produced a smooth chemi wood model of the Velocity Mobile Phone, which I will be able to add detail and finish during the next couple of weeks.
Materials!
I have used Chemi-wood for the keyboard and screen section of my model as it can be finished to a very smooth standard and will not need sand sealing, which will take up a fair amount of time. I find Chemi wood is a great material, as it sands well and machines even better.
Subscribe to:
Posts (Atom)

